Streaming on Twitch offers creators a chance to build a broadcast right from the comfort of their home. Whether you’re gaming, commenting on the latest news of the day, or promoting your new pop album, Twitch offers a world of possibilities. But to build your kingdom, you need an aesthetic, which is where Twitch overlays come in.
Today, we’ll walk you through the basics of building your Twitch overlay and customizing your page. Here’s your beginner’s guide to Twitch overlays.
What Are Twitch Overlays?
Simply put, Twitch overlays are the graphics displayed over your Twitch stream. When you watch your favorite channel, the overlay designates the usable space in a stream. It defines where your chat box, game footage, webcam, and social links are displayed on your page. Overlays help you set your stream apart, creating a visual identity for your brand.
A Twitch overlay can be simple or wildly complicated. It is an extension of your voice and identity. Take some time to think about how you want to represent yourself.
How To Make A Twitch Overlay
Making a Twitch overlay brings to mind the tagline for an old board game called Othello. The game was advertised as taking “a minute to learn, a lifetime to master.” Similarly, the complexity of your Twitch overlays will depend upon your design skills. However, if you’re on this page, we will assume that you’re new to designing.
We’ll use a free online design tool called Canva, which has specific Twitch overlay templates. Don’t worry. Canva is one of the easiest-to-learn design apps available today.
Canva Free Vs. Canva Pro
There are two options with Canva: free and Pro. The free version comes with a powerful editor that lets you build shapes, draw, add text, and change colors within your browser. It even includes a few hundred free graphics and templates to get you started.
The Pro version of Canva costs $14.99 per month or $119.99 per year for one person. With Canva Pro, you can access every template, shape, graphic resource, texture, and feature Canva offers.
If you’re serious about building the best-looking Twitch overlay possible, we highly recommend paying for Canva Pro. The templates alone are worth paying for at least a month of the service to get started. You can build an incredible Twitch overlay for free by using Canva. But the paid version will dramatically broaden your creative options.
Making A Twitch Overlay With Canva
Canva is a powerful web-based drag-and-drop design program for creating art and web assets. More importantly, Canva has a free option specifically for creating Twitch overlays. With Canva, you don’t need to design all of your pages at once. It’s best to design the pieces of your overlay individually, which allows you to fine-tune them to your specific needs.
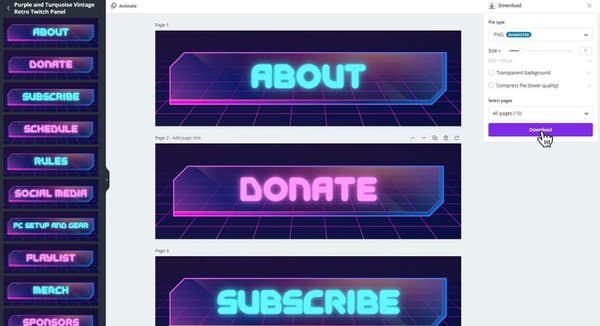 |
| Canva |
The image above shows several different buttons built in Canva. Once you’ve finished creating your buttons, pages, and scenes, you can download them all with the “Download” button in the top right corner.
How To Use Canva
You’ll first need to go to Canva’s Twitch overlay creation page, which is located here. Don’t worry if you’re overwhelmed the first time you load the page. There’s a lot to discover and explore. You should see this page when you load the link.
 |
| Canva |
The tools menu is on the left side of the screen. This is your artist palette for creating. Let’s walk through the available tools.
How To Get Started With Canva (Or Accepting You Need To Watch Tutorials)
When you’re learning any new design program, we suggest that you spend some time watching tutorials. Canva has an incredible series on how to get started making content within the program. This will walk you through the basics, from putting down your first shape to resizing, picking colors and beyond.
Once you’ve watched the basic tutorials, we suggest experimenting with an existing idea. Pick a template from the Canva Twitch overlay options. Move around boxes. Change the text. Resize your shapes via drag and drop. Go into the Elements tool option and try adding some shapes. Load up the Giphy app and insert your favorite GIF from The Office.
Playing around is the best way to learn the basics of a design interface like this. Once you grasp the basics, you can think about your overlay.
What is the best size for Twitch overlays?
According to Canva, the standard size for Twitch overlays is 1920x1080px. When you finally import it to Twitch, this size will optimize your art for the best and highest screen resolution.
How Many Twitch Overlays Do I Need: A Crash Course In Scenes
Think about what you see when you watch your favorite Twitch channels. Your favorite streamers have different screens and overlays for various actions. Throughout the stream, you will see the following overlays.
Plot Out What You Need To Avoid Choice Overload
Think about what kind of channel you have and what you’re building. Get out of a piece of paper before developing your overlays. Think about what kind of overlays you’re going to need. Visualize for yourself what you want your Twitch overlays to look like.
This stage doesn’t have to be pretty! We’re not building fine art yet. Instead, we’re thinking about design away from our tools. It’s easy to get wrapped up in building things with infinite options, known as “choice overload” — a paradoxical phenomenon in which people find themselves overwhelmed by their options during decision-making.
This sense of choice overload is a real danger when working with a tool that features as many options as Canva. The risk is particularly true if you’re neurodivergent and easily distracted.
No matter what, you should make at least four basic scenes.
What you’ll need beyond these four will depend on how many activities you plan to stream. You may need to make multiple “Main Stream Overlays” if you split your time between activities.
A streamer who plays music half the time and games the rest of the week will need an overlay for each activity. Remember this when outlining what you want your overlay to look like.
Questions To Ask Yourself When Brainstorming A Design
Here are some basic questions you should ask yourself when brainstorming your Twitch overlay design.
What Should I Include In A Twitch Overlay?
You’ll need to make two Twitch overlays: Tile Cards and Stream Pages.
Title Cards are static, like your “Stream Starting Soon” or a “Stream Has Ended” scene.
Stream Pages are the overlays that you use during your stream themselves.
Elements Of A Title Card
Title cards inform your viewers of simple information. You can include links to your socials, a countdown to when the stream starts, or custom images you’ve made for your brand. Here is an example title card we made in Canva.
 |
We’ve included the background from the Stream Page template we use below, then added a “Stream Starting Soon” GIF from Canva’s free tools. Note that your title card doesn’t need to be animated! You can add original art, a photo, or text to the card. Think about what would draw you in as a viewer and brainstorm before you get started.
Elements Of A Stream Page
Designing a Stream Page is more complicated. Here are the things you’ll need to consider including on your Stream Pages. We’ll use one of Canva’s free samples to walk you through it.
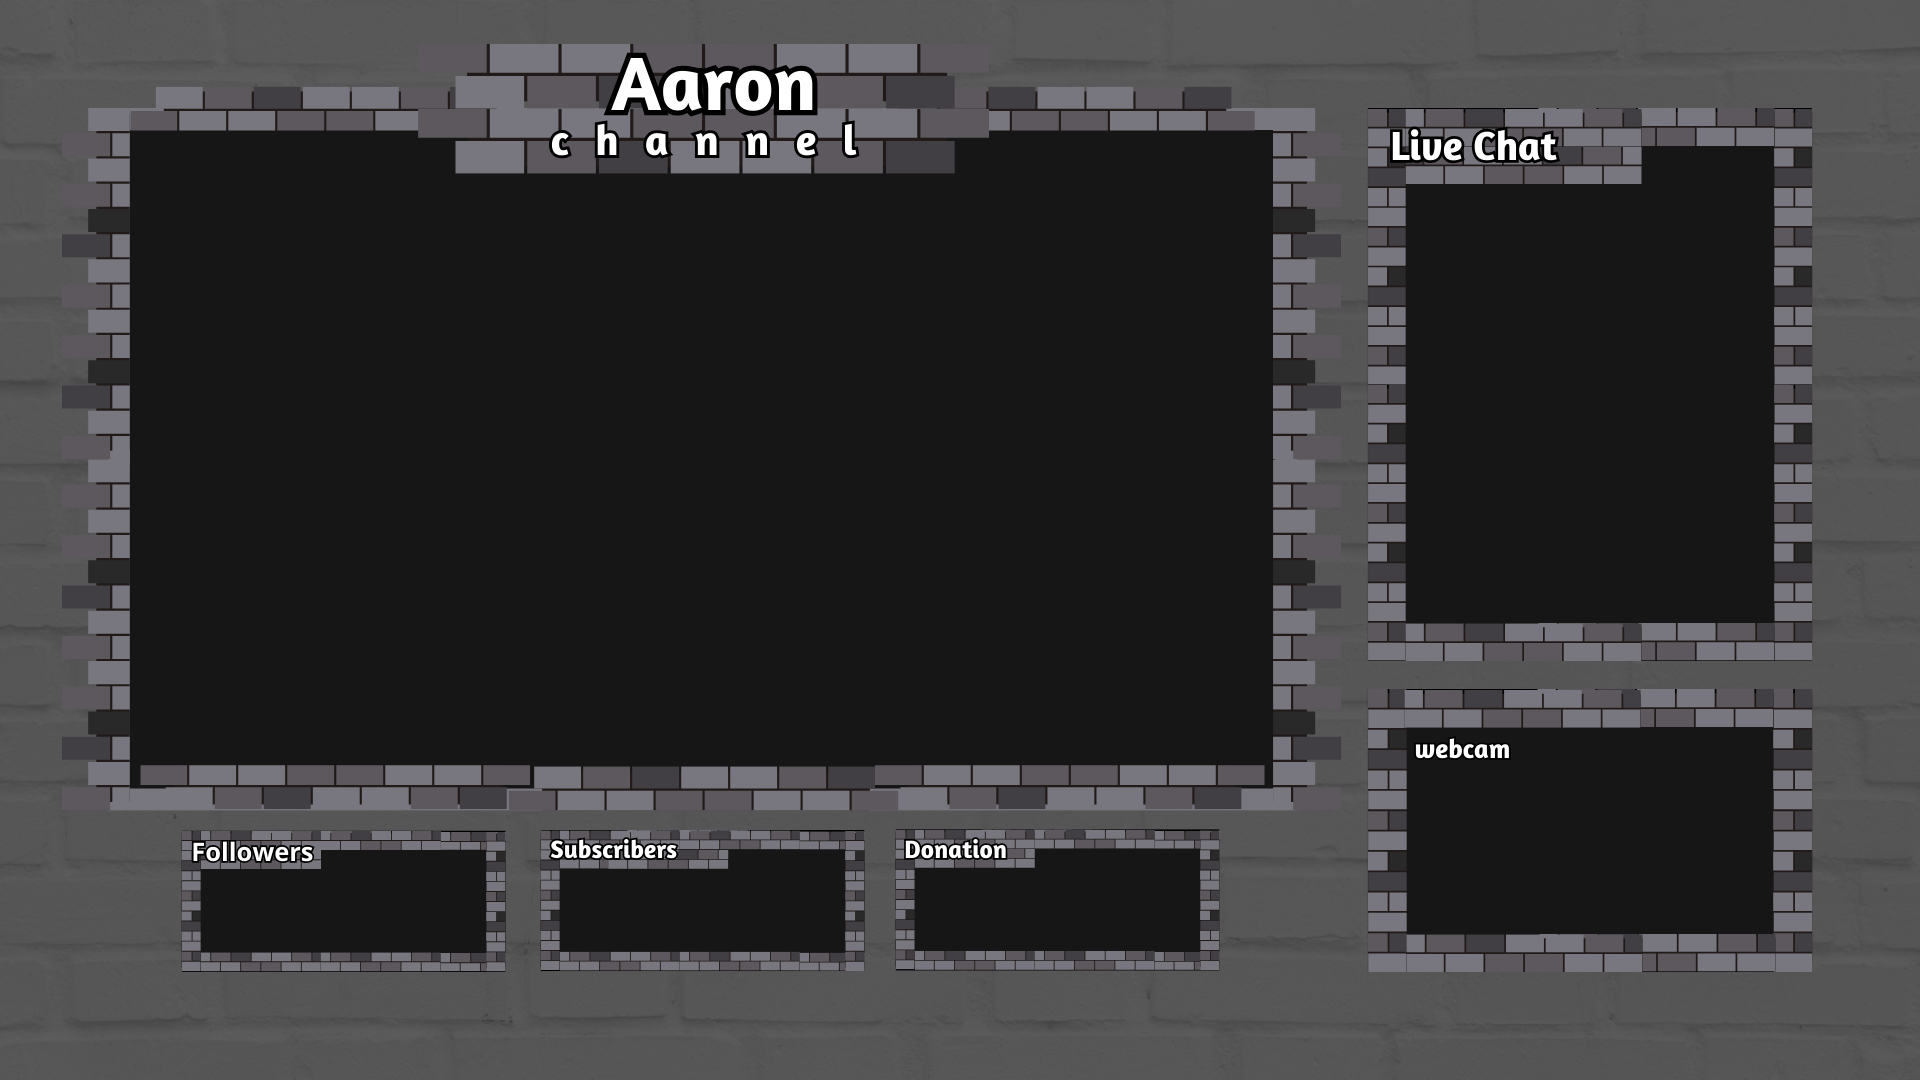
Webcam Box
This is the first thing you’ll need to decide on for your Twitch overlay. The webcam frame is where you plan on putting your webcam feed on your overlay.
For gamers, you’ll want to ensure your face isn’t over the gaming content you’re streaming. As you learn deeper design techniques, you can add a name tag to this box with your social handles, insert alerts or notifications, or more.
When starting out, keep it simple. Outline the webcam frame box with a color, and add a subheader with the social accounts you want to promote.
Twitch Chat Overlay
This is where your audience chat goes. You want to make it big enough that viewer responses don’t get buried immediately. People come to chat to talk to others. Your chat will move faster as your channel grows; that’s out of your hands. But in the short term, ensure there’s enough room to read what people say.
Stream Box
This is the box where your streamed content will go. Whether you’re streaming a game, reacting to YouTube, or showing other content, this will most likely be the largest box on your screen. The exception to this rule is when you are your stream’s subject. In that case, you’ll want the Webcam box to be the biggest.
Stat Boxes
Look at the bottom of the example overlay above. You’ll see three smaller boxers marked Followers, Subscribers, and Donations. These are stat boxes; stat boxes show off your stream’s performance to viewers. Here’s what each of these boxes does.
You don’t necessarily need each of these state boxes on your stream. This is one reason you should consider outlining what you’d like your Twitch overlay to look like before you start building. When using a template, you can always delete boxes you don’t need.
Exporting Your Twitch Overlay Elements From Canva
Exporting the elements of your Twitch overlay out of Canva is simple.
Step 1: Select the Share button at the top left of the screen.
Step 2: Select the Download button. This menu offers several options regarding file types and sizes. Canva suggests downloading everything as a PNG. This is a great option unless you have GIFs in your design. In that case, make sure to download your GIFs individually.
Canva will also ask you here which of the pages you’ve designed you’d like to download. If you select more than one, they will be downloaded to a zip folder. Select the Download button when you’re ready to save to your computer.
How do you add your overlay to Twitch?
Adding your overlay to Twitch will depend on your broadcaster app. A broadcaster app is used to send your video stream to Twitch. If you’re using a console like Xbox One or PlayStation 5, they can broadcast for you.
On PC or MAC, you’ll need an encoder like Twitch Studio, Streamlabs, OBS Studio, or XSplit. If you want to use overlays on Xbox or Playstation, you’ll want to use the Lightstream broadcaster. Please note Lightstream requires a monthly subscription.
The basics are the same on most broadcast services. However, we highly recommend using Streamlabs or OBS Studio. Twitch Studio requires you to make your overlays into a special file type. With OBS and Streamlabs, you can simply upload the individual elements.
Step 1: Open your Twitch broadcast app of choice.
Step 2: Go to the Scene menu and create a new Scene. Now select Sources and import your overlay files.
Step 3: Arrange your overlay images into your scene. You must do this for each scene you make, from your “Stream About To Start” page to your “Main Stream” overlay page.
Step 4: Define each of your boxes using your broadcast app’s Stream Label sources. For example, you must select the Chat Box and tell your broadcaster app to put your chat information there.
What Are The Best PC And Mac Broadcaster Apps?
We suggest reading the tutorials offered by Streamlabs and OBS Studio to fine-tune getting your overlays running. Both programs have their own quirks and design specifics. More importantly, these apps regularly update. You will always find the most up-to-date information about how to use these services directly from them.
We can teach design philosophy. However, if you want the most up-to-date information on how a program works, turn to the people who make it. Most importantly, learn about the systems you use to host and run your stream. You don’t want to spend hours troubleshooting on a forum when something goes wrong with your stream.
Every week Passionfru.it brings you the best news stories, commentary, and tips and tricks in the world of creation. Sign up for our newsletter below so you never miss out on a story. We promise not to flood your inbox.