At this point, there are as many ways to live stream on social media as there are social media platforms. But YouTube Live is a strong, versatile contender for content creators looking to engage with their audience more directly than simply posting videos. You can go mobile and you can monetize, but you can also employ a multi-cam setup, stream gameplay, moderate live chats, schedule, and archive live streams, integrate third-party streaming software, and so much more—so let’s talk about how to live stream on YouTube.
What is YouTube Live?
YouTube Live is the platform’s answer to live streaming, allowing users to broadcast to their audience in real-time, with the option of opening up a live chat to keep the engagement open. Live streaming on YouTube can be used for anything from Q&As to gameplay to workshops. YouTubers are even able to schedule a premiere of a new video to be presented as a live event and can archive the live stream as a regular channel video for audiences to come back to later.
What are the requirements for YouTube Live?
YouTube Live is free to use, and there’s no minimum number of subscribers necessary for anyone wanting to stream via webcam or encoder. Users who want to live stream via mobile are required to have at least 1000 subscribers for full access to live streaming, however.
Beyond that, the two major requirements are that you verify your channel by confirming your phone number and that you haven’t had any live stream restrictions on your account in the past 90 days. To avoid having your live streaming abilities restricted, you’ll want to be in compliance with YouTube’s Community Guidelines, and keep these rules in mind:
- Minors 13 and under have to visibly have an adult present during a live stream
- Your live stream cannot feature content copyrighted by someone else
- Don’t show someone handling firearms during a broadcast
Preparing for your YouTube live stream
Before you jump into your first YouTube Live, you’ll want to take care of a few things.
1. Enable live streaming
The first thing you need to do is enable live streaming on your channel.
Step #1: While logged into your YouTube account, on the homepage, click the camera/“Create” icon in the top right corner.
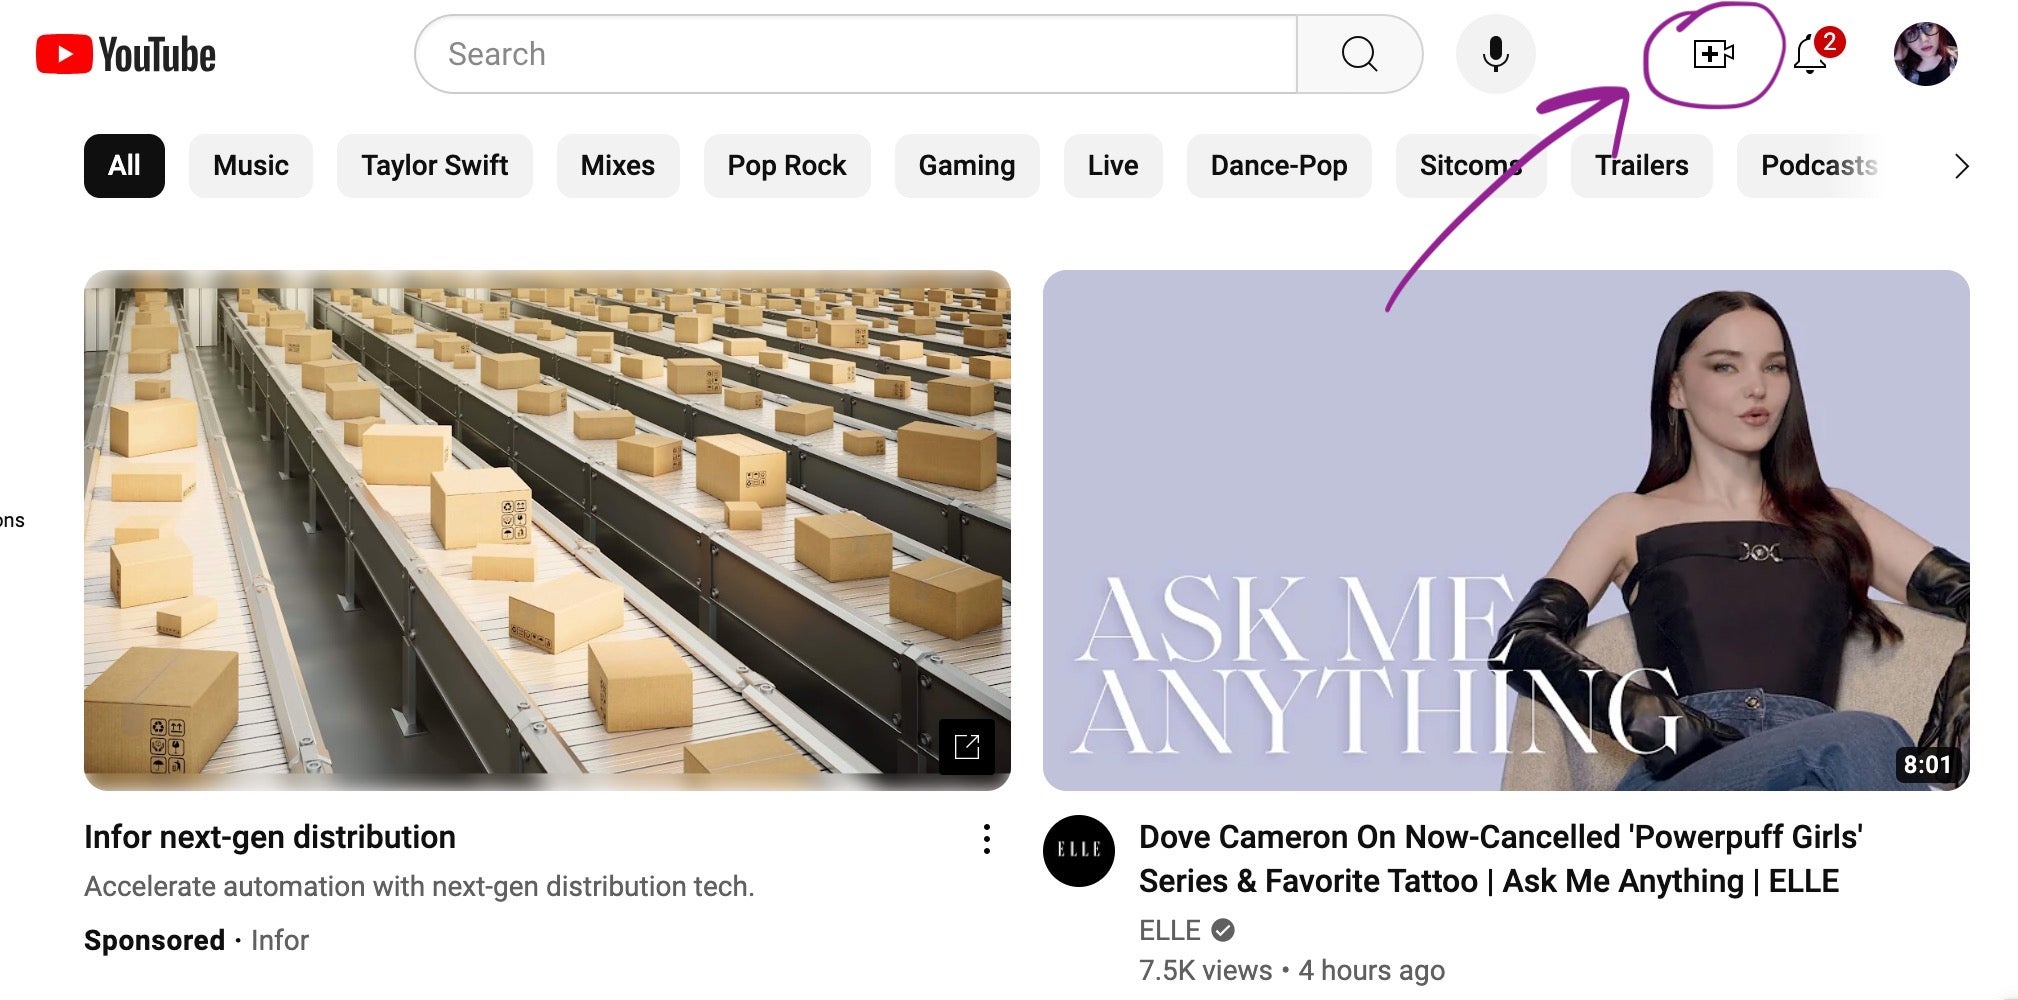
Step #2: Select “Go live.”
Step #3: If you haven’t already enabled live streaming on your account, it will prompt you to do so.
Step #4: From there, if you haven’t already verified your channel, it will prompt you to do that as well.
It may take up to 24 hours for your account to be ready to livestream after you’ve enabled the feature, so make sure you do this well in advance of your planned broadcast. This is an essential first step in understanding how to broadcast on YouTube.
2. Determine how you plan to broadcast
As previously mentioned, you can stream via three different options:
- Webcam: This is the easiest way to go live, and is generally recommended for first-timers who don’t require anything complicated for their stream. All you do is just flip on your built-in or attached webcam and you’re good to go.
- Mobile: To go live on YouTube via mobile, you have to have a minimum of 50 subscribers, but accounts that have more than 50 and less than 1000 subscribers will have their allowed audience limited. It can also take a few weeks after hitting 1k subscribers for mobile streaming to be fully enabled, so don’t count on it switching over right away.
- Encoder: Streaming software or hardware encoders are the best option for streamers who have more complicated needs, such as streaming gameplay, using multiple cameras, or other unique scenarios. You can find a list of encoders verified to work with YouTube on their website.
3. Check your internet
YouTube recommends the following internet speeds for broadcasting live:
- standard definition: 3mbps
- 720p/1080p high definition: 5-10mbps
- 4K video: 25mbps
You can test your internet speed for free at various online sites.
4. Test your equipment
This is easier if you’re planning on going live via webcam or mobile—just make sure your camera and microphone are working and you’re all set.
But if you’re using an encoder, make sure you run a test with all of the equipment you plan to use to make sure it plays nice. This includes cameras and microphones, but you should also test any lights you plan to use, make sure your gameplay setup is good to go, and pay attention to ambient noise levels in case there’s something that needs to be addressed. The last thing you want is to be scrambling at the start of your broadcast to troubleshoot!
How does YouTube streaming work?
Learning how to go live on YouTube successfully means being prepared and structured. Other social media platforms may lend themselves to more off-the-cuff live streams, and that’s certainly possible on YouTube, but many creators find they benefit from planning things out in advance for this particular audience.
1. Plan your content for livestreaming on YouTube
Recording videos has the obvious benefit of allowing for numerous takes, cutting out the parts that drag, and giving you countless opportunities to make sure you come across the way you want to in the final video. Live streaming is a different beast.
Once you’ve gone through your usual process of determining what your video will be about, how it caters to your niche, and anything else you consider in the early stages of creating new content, you should go the extra mile and make sure you’re prepared for the live aspect beyond the tech. Consider these things when learning how to livestream on YouTube:
- Do you have a structure in mind?
- Will you have guests?
- How do you plan to interact with your audience?
- What about this particular topic lends itself to being live rather than a pre-recorded and uploaded video?
- What are you hoping to accomplish with your live stream?
These questions can help you guide you in crafting an engaging live stream that your audience is glad they made time to watch in the moment rather than merely catching the recording later—and that will encourage them to make the time to watch live in the future, as well.
2. Schedule your live stream
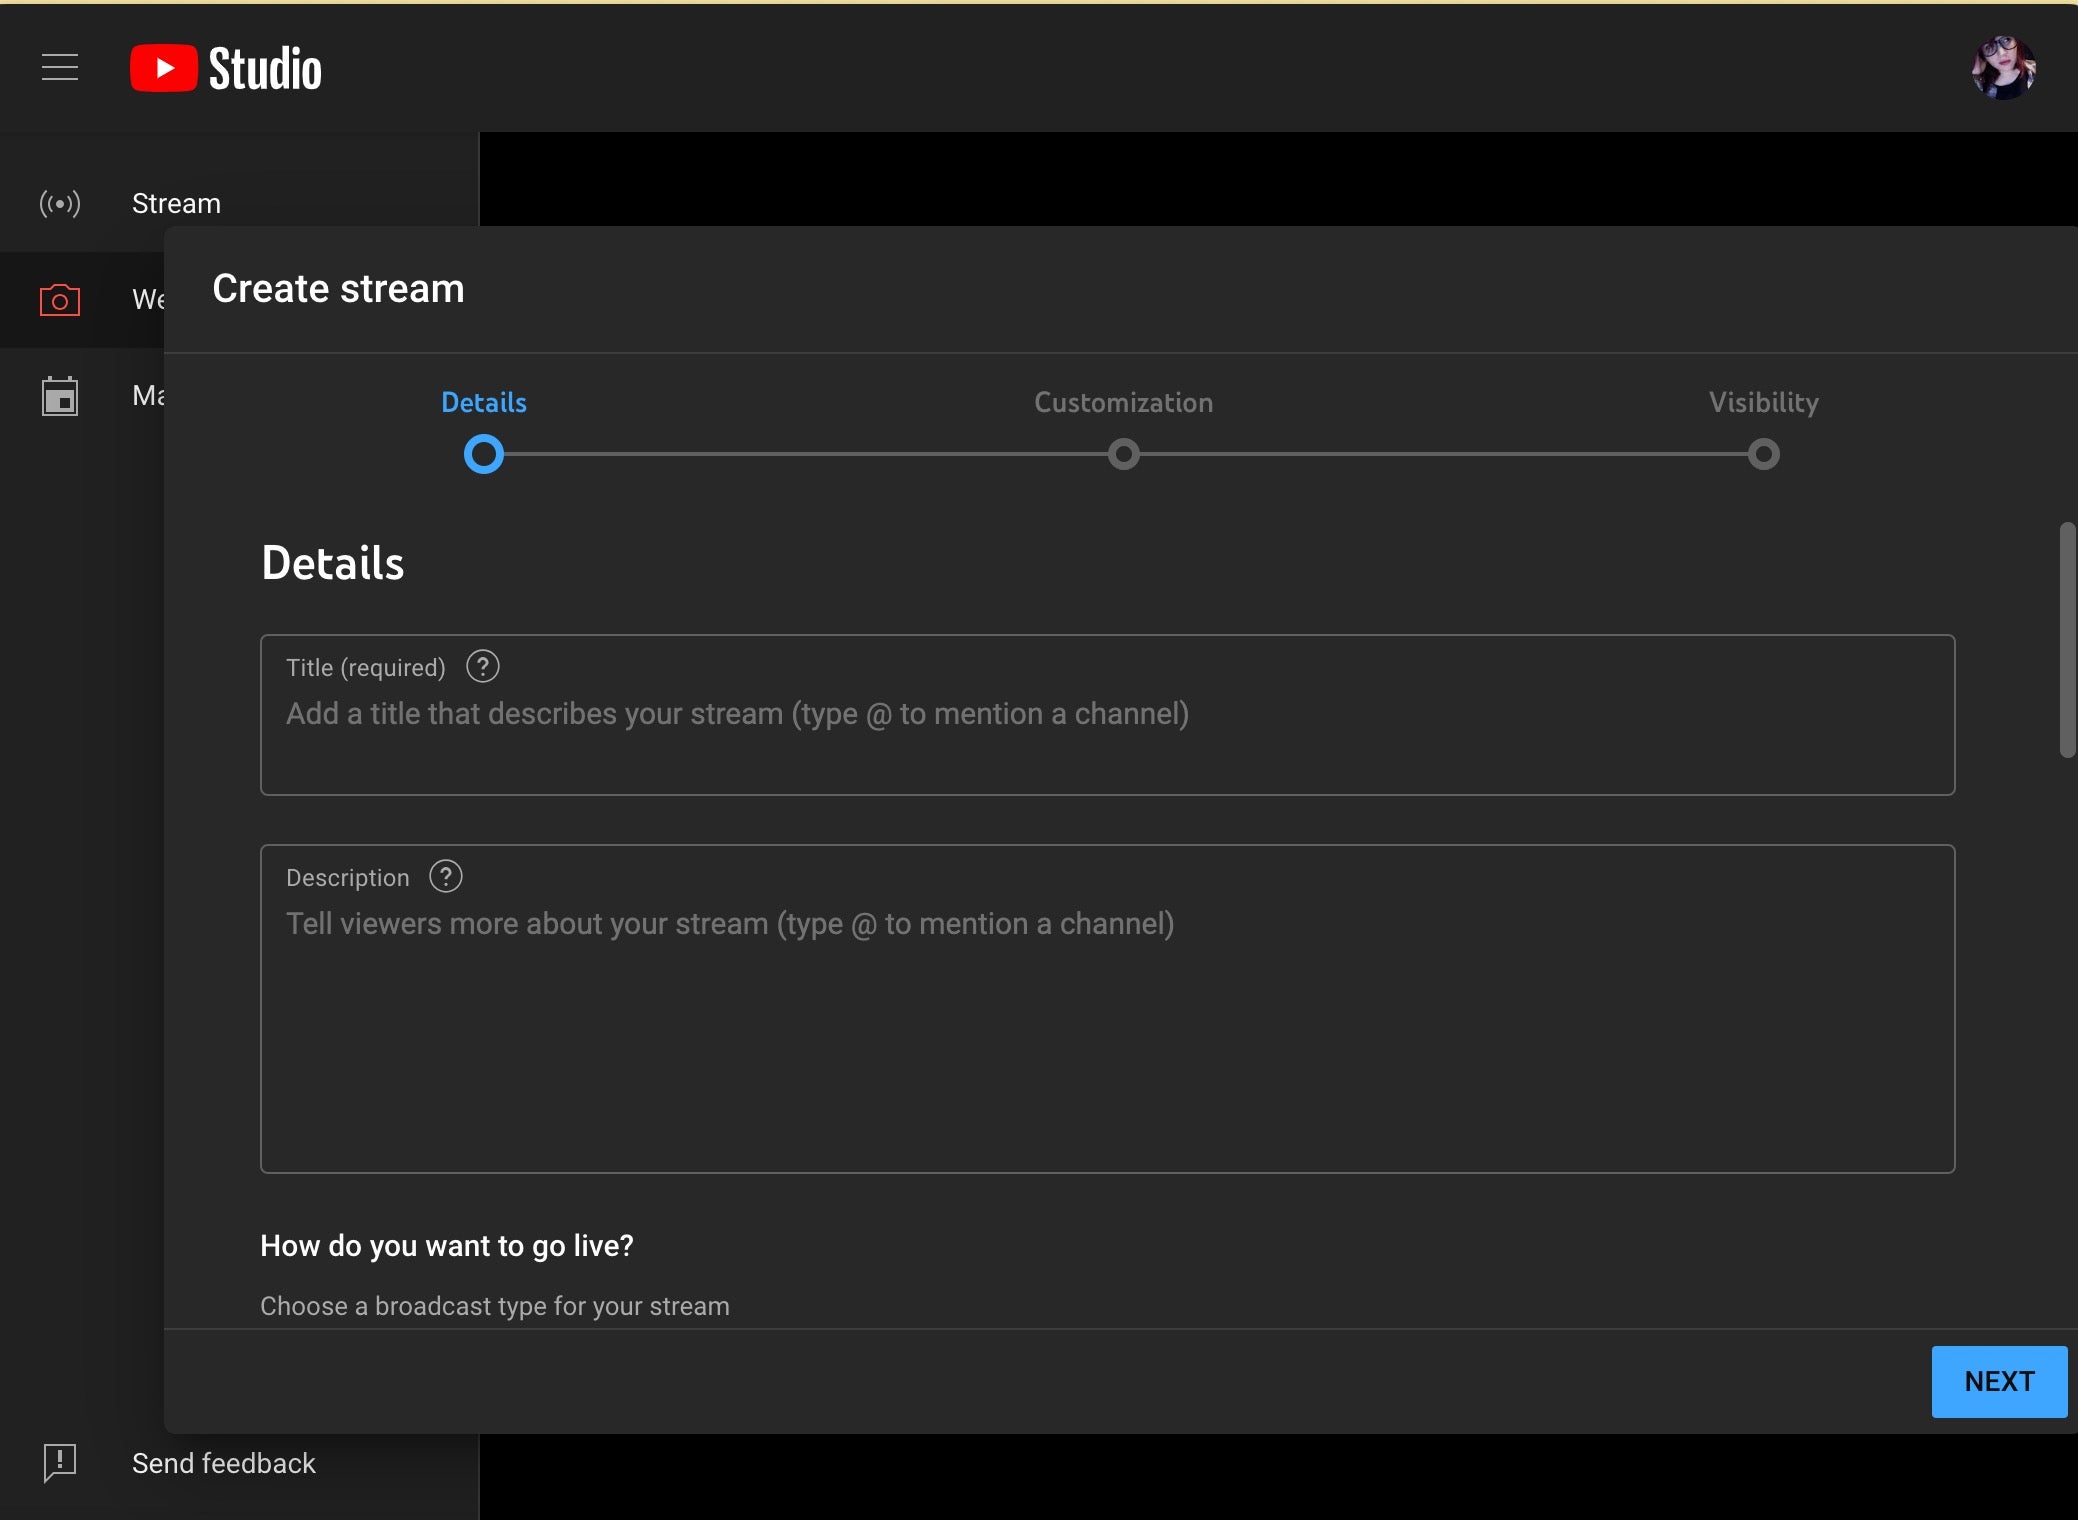
Preparing your live stream in advance lets your dedicated viewers know what you have planned. And you can do this by literally setting up the actual video and scheduling it for a later time or date. Here’s how to go live on YouTube at a later date:
Step #1: Open the YouTube Live Control Room by clicking the camera/“Create” button in the top right corner and selecting “Go live.”
Step #2: You’ll be given options to stream “Right now” or “Later date.” Select the latter.
Step #3: Here, you’ll see your webcam/mobile/encoder options. Choose whichever one you plan to use to stream. If you opt for the encoder, scroll down to read more about how to set that one up.
Step #4: This is where you’ll fill in all the information you would for a regular video—your video title, description, category, thumbnail, tags, and other information. You can even preemptively add it to a playlist. If you’re planning on promoting your video ahead of your live stream, make sure you put all the same effort into all of this as you would a regular upload, as it’s your opportunity to sell people on tuning in. And if you need help coming up with eye-catching thumbnails and titles for livestreaming on YouTube, we’ve got you covered.
Step #5: Choose your audience interaction settings—whether chat will be enabled, who will be able to participate, etc. It’s a good idea to designate a chat moderator ahead of time so you won’t have to be scanning comments to block anyone causing problems while you’re live. You can do this via your Community Settings.
Step #6: Select your stream’s visibility (private, unlisted, or public) and the time and date you plan to go live. And you’re set!
3. Promote your YouTube Live
Once your live stream is scheduled, you can start promoting it to your audience so they know to tune in. Use your other socials to spread the word, mention and link your upcoming live stream in any regular uploads you have planned before then, and post in the Community tab if your page is eligible.
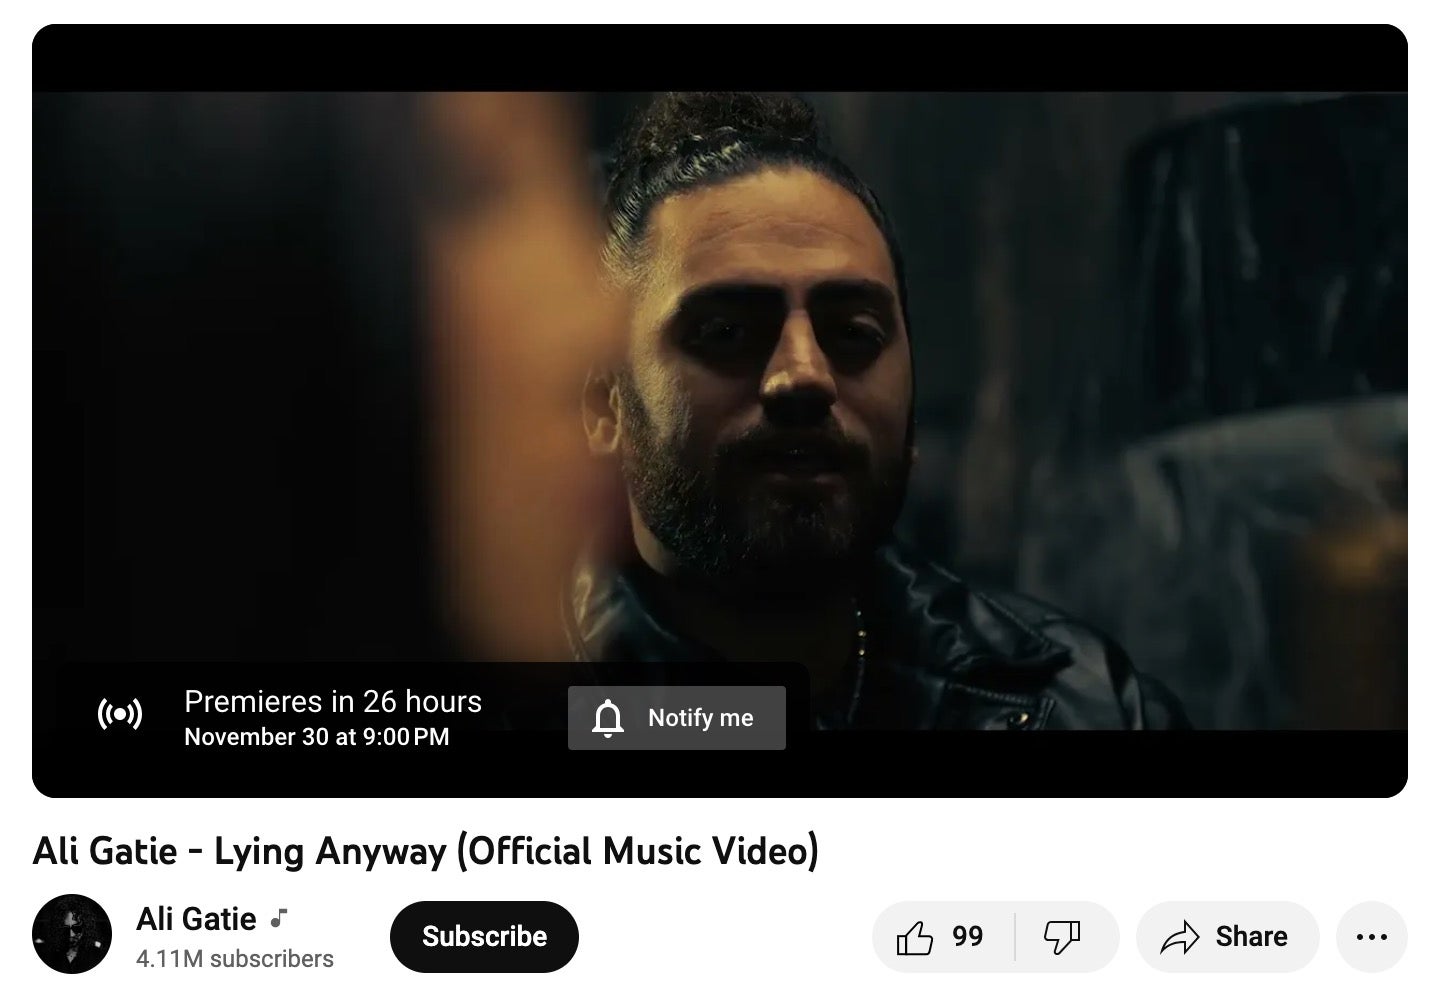
It’s also a good idea to encourage viewers to request a notification when you go live. They can do this by navigating to the scheduled live stream page you set up, which will tell them the time and date of the upcoming stream alongside a button that says “Notify me.”
4. Consider monetization options
Creators who participate in the YouTube Partner Program have several built-in options available for monetizing their live stream. Consider these in advance, and how they may factor into your plan for broadcasting on YouTube.
- Advertisements: YouTube can insert ads into your live stream for you at random intervals, or you can choose set times for them to appear. This customization option will pop up when you’re scheduling or setting up your live stream, for eligible creators.
- Channel memberships: If you offer channel memberships through YouTube’s Partner Program (paid subscriptions supporting your channel), you have the ability to hold members-only live streams, or do public live streams where only members are allowed to engage in the live chat.
- Super Chat and Super Stickers: Fans can have their messages in the live chat highlighted by purchasing Super Chats, and they can also purchase Super Stickers to have an animated image pop up during chat. Creators get 70% of the revenue from these purchases, so encouraging fans to keep buying them by interacting with and thanking those who do can add up.
There are other ways to monetize your YouTube channel live streams indirectly, whether you’re in the YouTube Partner Program or not. You can advertise your merchandise, shout out your Patreon or ko-fi, or find other creative ways to make some cash on top of growing your audience, starting with checking out our guide for revenue generation on YouTube.
How to live stream on YouTube
Your video is prepped, your equipment is all set up, you’ve got the perfect aesthetic for shooting, ambient noises have been quieted, your internet is running smoothly, and you’ve grabbed everything you may need access to for the duration of the broadcast. Now, it’s time to get that stream going. Choose your fighter:
How to live stream on YouTube via desktop
If your webcam is hooked up and your YouTube account is verified, you’re good to go.
Step #1: On your computer, navigate to the YouTube Live Control Room by clicking on the camera/“Create” button + “Go live” at the top of the YouTube homepage.
Step #2: If you already have a broadcast scheduled, click “Manage” on the left panel and skip to the final step.
Step #3: To start a new unscheduled live stream, opt for streaming “Right now” and then select “Built-in webcam.”
Step #4: Fill out all the information about your live stream (see the “Schedule your live stream” section above for more tips), including your title, description, audience, and monetization options as the screen prompts you to do so.
Step #5: Smile—it’s time for your webcam to snap your thumbnail image!
Step #6: Double-check your camera and microphone settings, then click “Go live” whenever you’re ready.
How to live stream on YouTube via mobile
Assuming you meet the eligibility requirements to live stream via mobile, you’ll want to go ahead and download the YouTube app to your iPhone, iPad, or Android device and log into your account. Once you’ve done that, follow these steps:
Step #1: Tap the circle with a plus sign in it at the bottom of the screen.
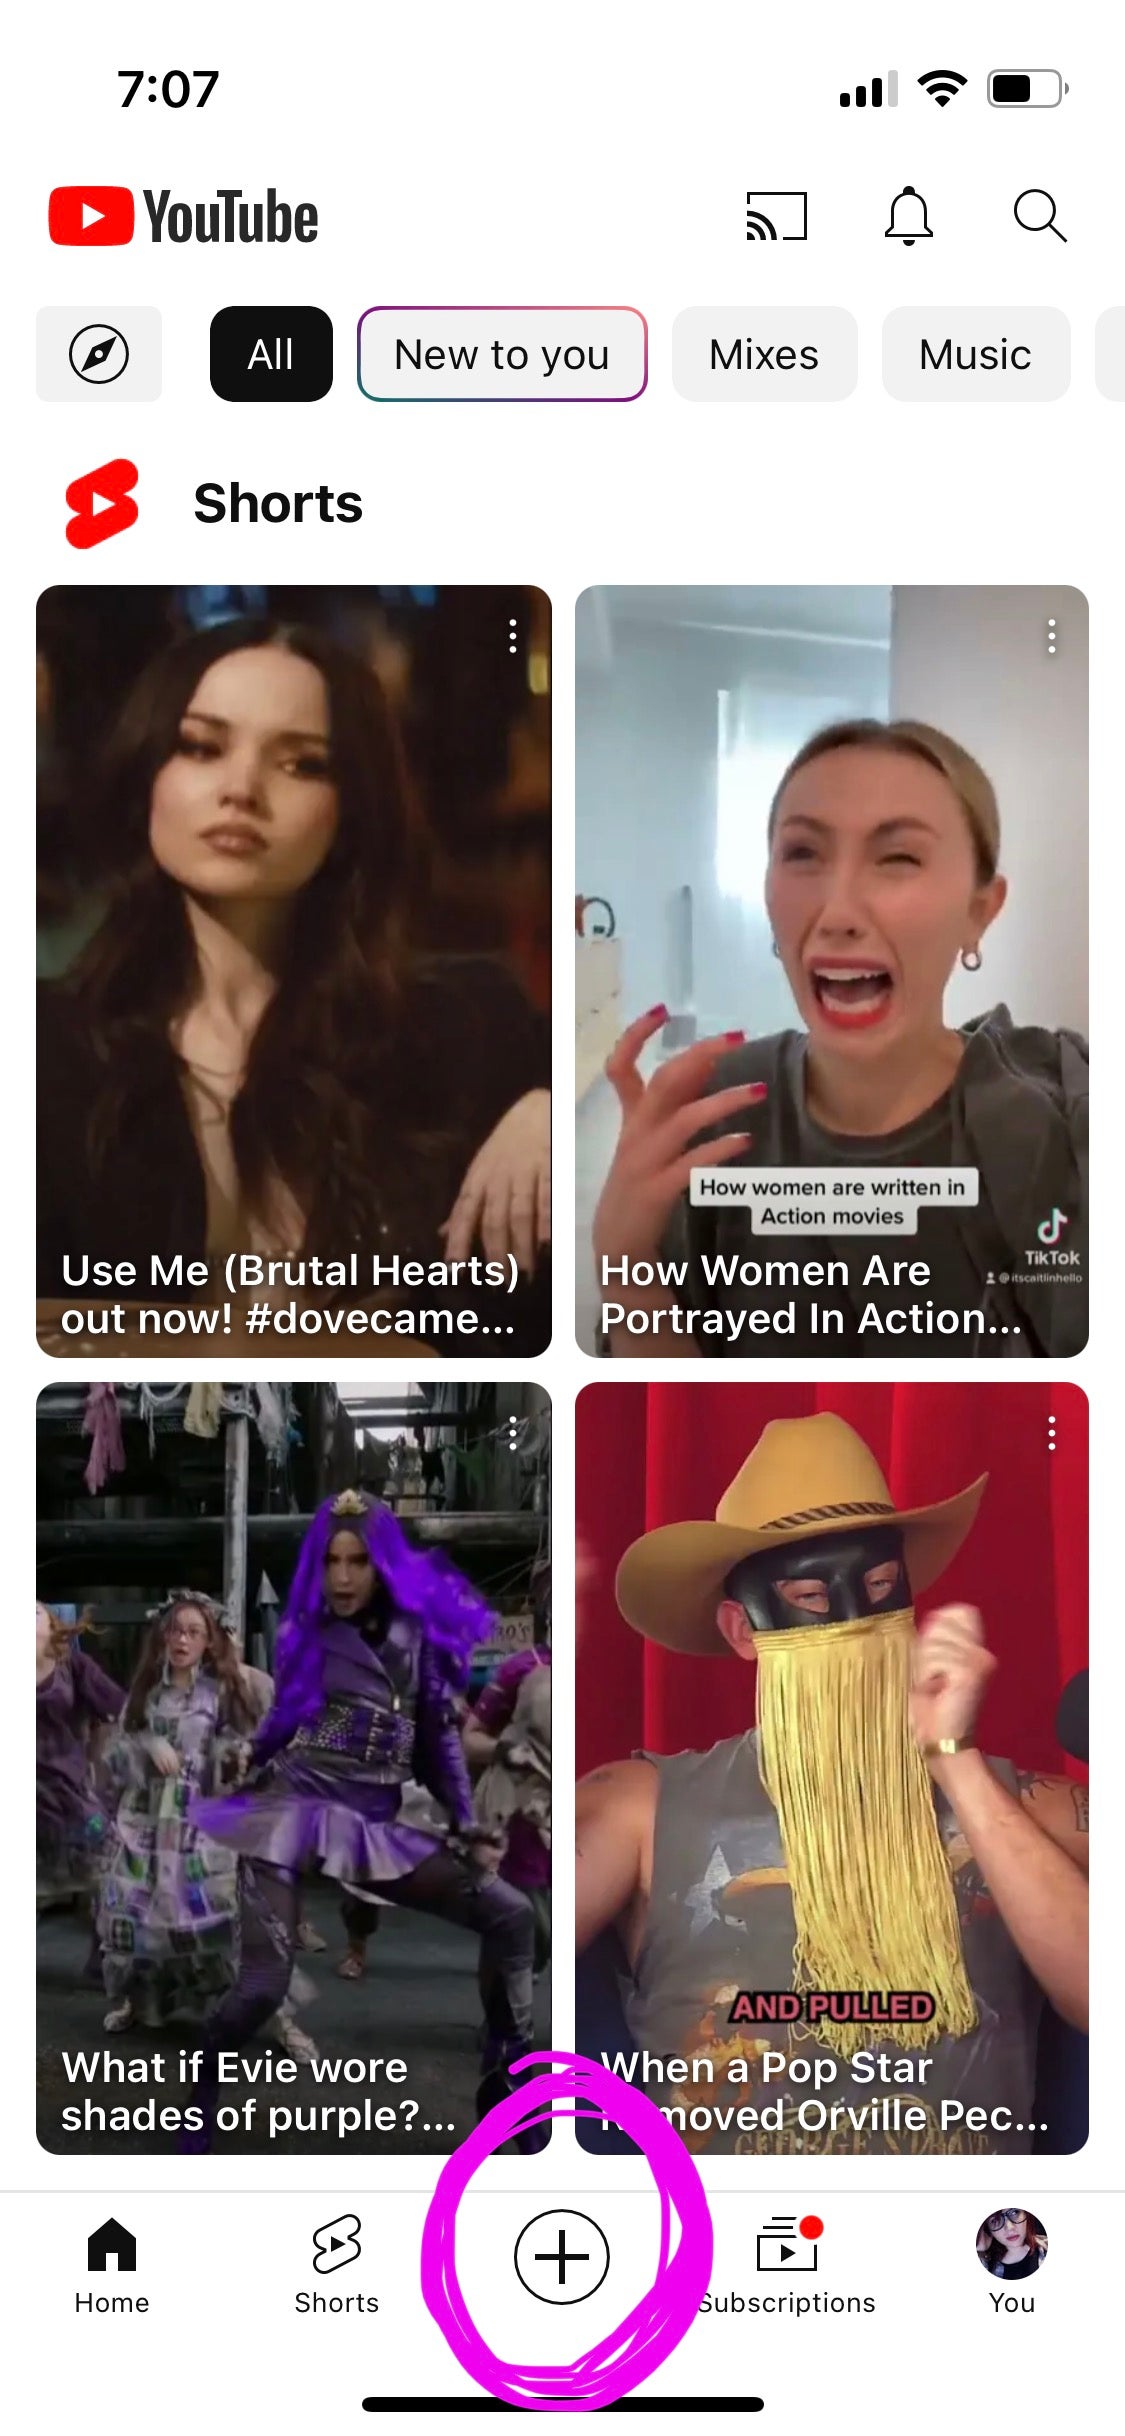
Step #2: Swipe over to the “Live” option to broadcast live on YouTube.
Step #3: If you need to adjust any of your settings to allow the YouTube app to access your camera and microphone, it will prompt you to do so here.
Step #4: If you already have a broadcast scheduled, tap the calendar icon in the top right corner and choose your pre-planned live stream.
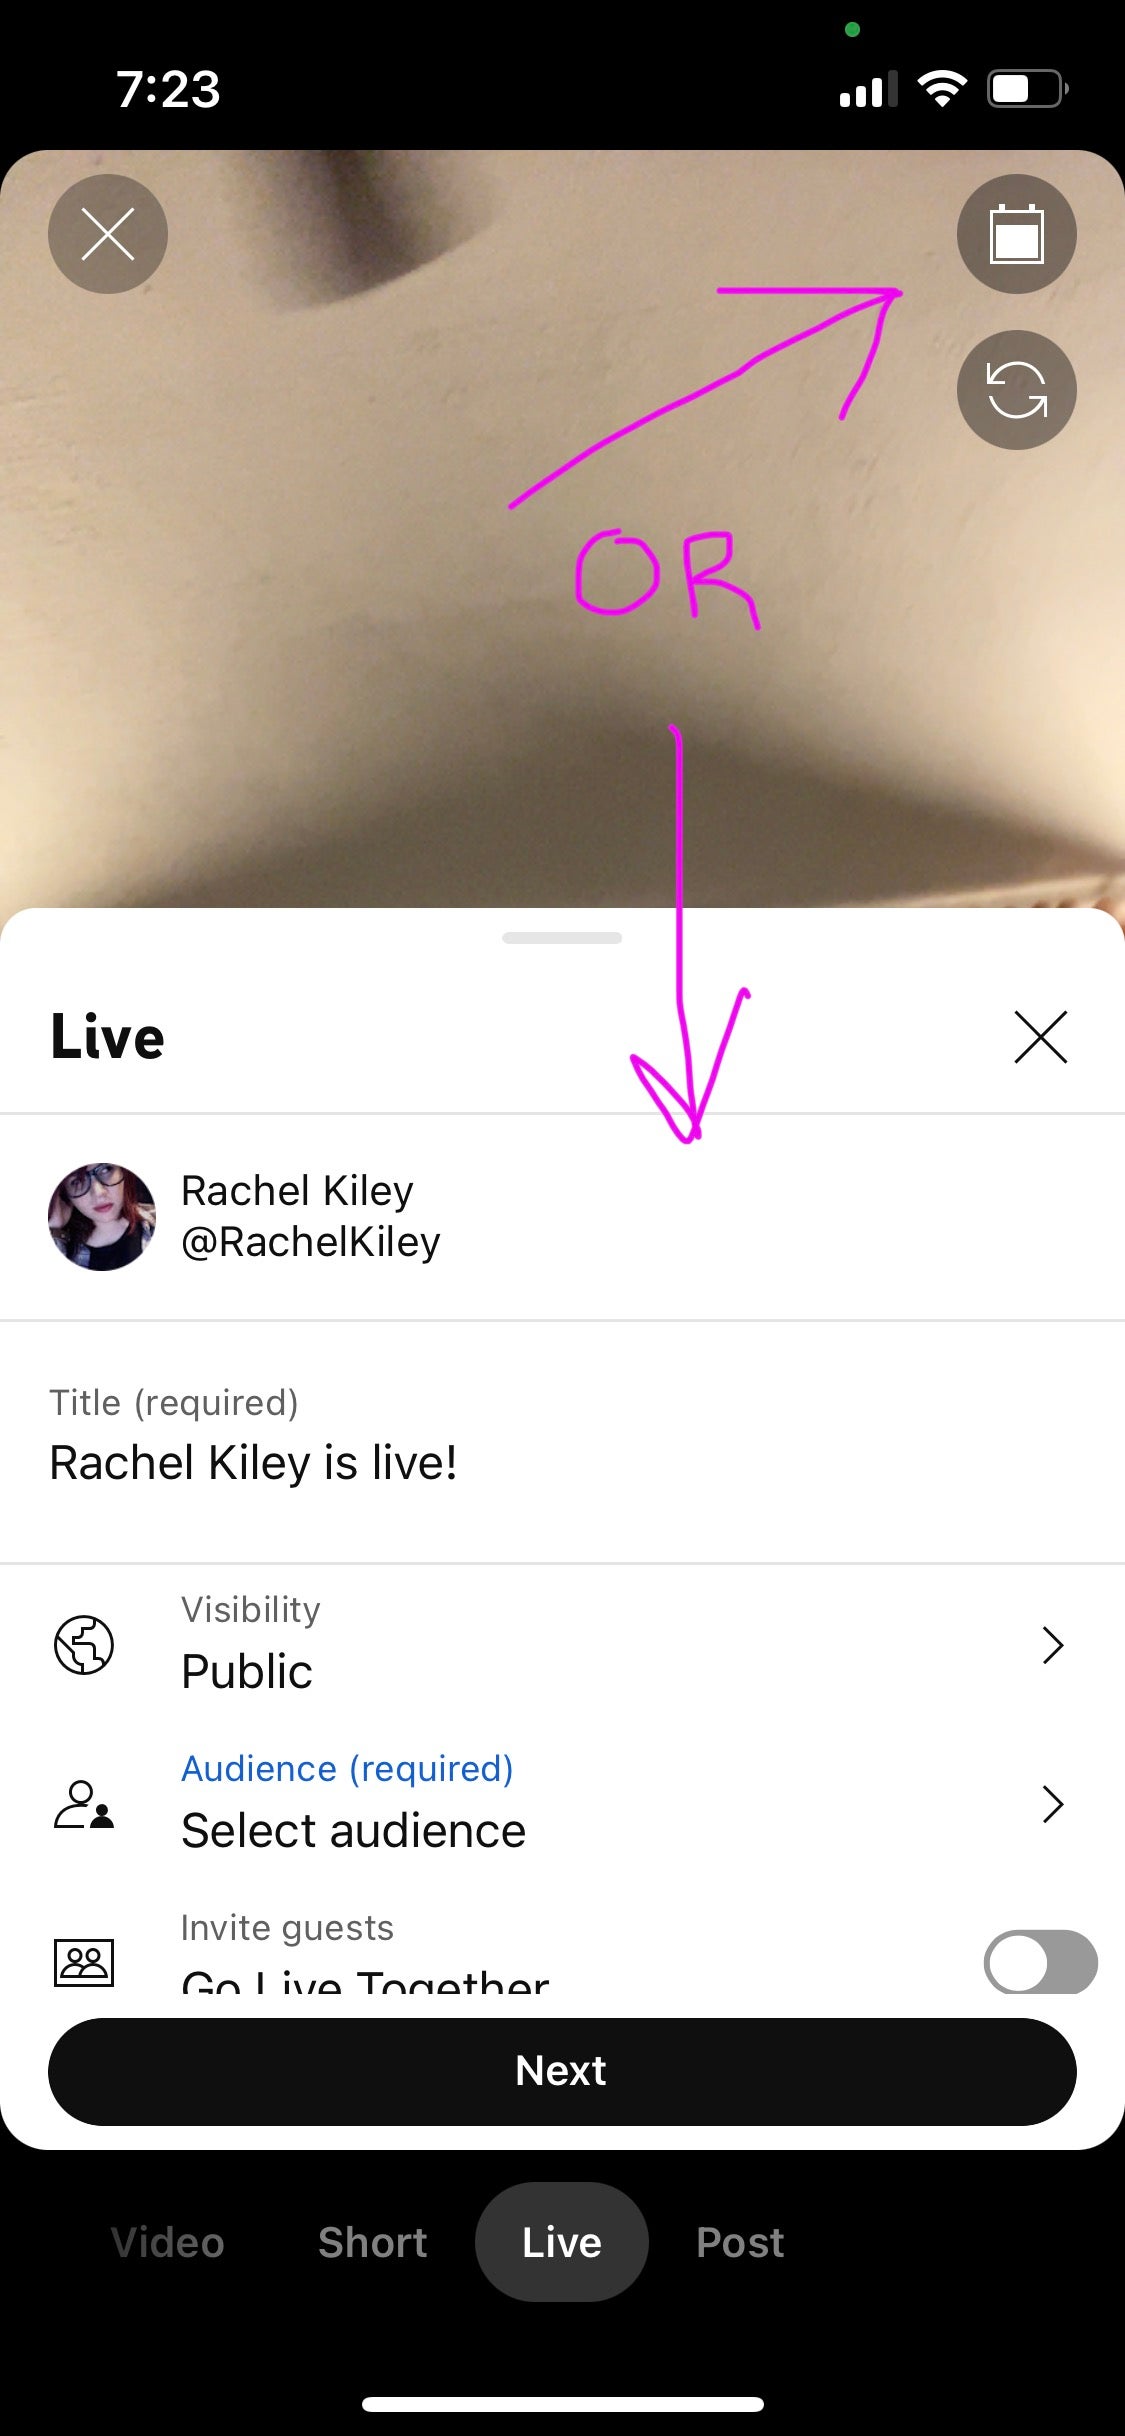
Step #5: If you don’t have a broadcast scheduled for going live on YouTube, this is where you fill out all your video information—title, audience, description, and more. Don’t forget to check the advanced settings for options like monetization and live chat! You’ll also have the opportunity here to invite guests or schedule the broadcast for later. When you’re ready, tap “next.”
Step #6: You’ll be able to look over and edit your title and thumbnail here if you want, and see how many viewers are waiting for your live stream to begin. When you’re ready, tap “Go live.”
How to live stream on YouTube with encoding software
Make sure you’ve looked over YouTube’s guidelines for what software, hardware, or mobile encoders are verified to be compatible with its live streaming and tested all of your equipment ahead of time.
Step #1: On the YouTube homepage, click the camera/“Create” button in the top right corner, then “Go live.”
Step #2: If you’re accessing a scheduled live stream, click “Manage” on the left panel.
Step #3: Otherwise, click “Right now,” then “Streaming software” to access YouTube’s Live Control Room for managing streams.
Step #4: Your software may also have an option to select streaming to YouTube. If it doesn’t, copy the “Stream URL” from the Live Control Room and paste it into the Stream settings or RTMP server in your encoder.
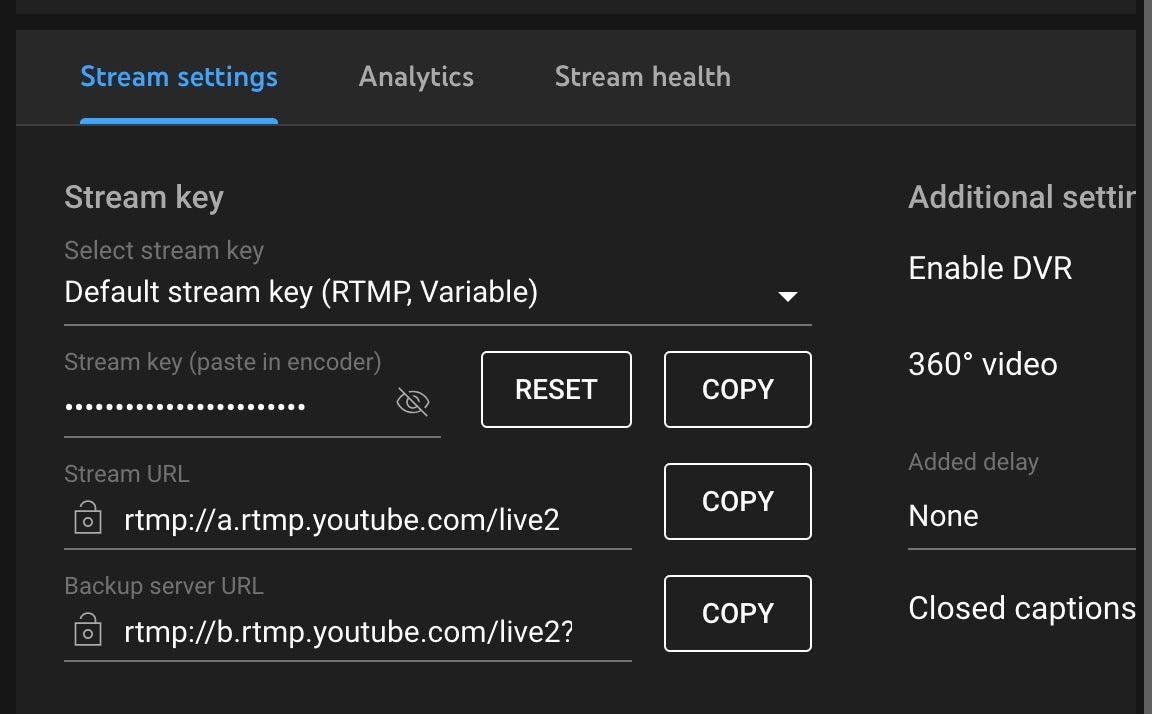
Step #5: Copy the “stream key” from the Live Control Room and paste it into the corresponding space in your encoder.
Step #6: Follow the instructions provided by your streaming software to finish setting up and go live.
Other tips for live streaming on YouTube
You’re basically a pro now, but here are a few more things to know or suggestions that may help you out when it comes to YouTube Live:
1. Use your analytics.
Some live streams may need to happen at a specific time, but if you’re looking to schedule something and it isn’t time-sensitive, check your analytics to see what time of day your audience tends to be online for the best chance at roping them in.
2. Check your batteries.
This is especially true if you’re using cameras outside of a webcam, or your phone, or anything imperative to keep your stream running smoothly. If you think it’s going to be a long one, have extra battery packs or chargers at the ready.
3. Archive your video.
YouTube will automatically archive your video if you stream for 12 hours or less. Saving it gives your audience a chance to rewatch their favorite parts, or check it out for the first time if they weren’t able to see it live—and get you more views in the process. Also consider creating a playlist for your live broadcasts so people can access them more easily.
4. Create a highlight reel.
In the spirit of getting more views, you can always chop up the lengthier video into a highlight reel to let people know what happened without having to watch the whole thing (or tempt them to do so). Depending on your content, you may also be able to come up with other creative ways to repurpose portions of the original video, whether on YouTube or for other social media platforms.
5. Utilize a chat monitor.
We touched on this briefly earlier, but designating one or two trusted people—these can be people you know, or audience members you believe in—to moderate your chats can be a lifesaver. They can deal with spammers or harassment or anything else bringing the vibe of your live chat down more quickly than you will be able to so you can focus on your content.
6. Engage with your audience.
One of the main reasons to go live is to establish a rapport with your audience. It’s up to you whether you want to answer questions, give shout-outs, or do something else entirely, but the chance to interact with a creator they enjoy is a major draw for viewers deciding whether to stick around for a live stream or just catch the highlights later.
7. Edit your settings during the stream.
Although it’s ideal to have everything set up perfectly ahead of your stream, you may realize partway through that you forgot to include a tag, or you may even want to change the title or thumbnail to something more enticing or something that more accurately reflects the direction your live stream has taken. The good news is that you can do this via the website at any time.
8. Have fun!
As much as we’ve stressed planning and scheduling your live stream on YouTube out, that’s because doing so should serve to let you focus on what matters in the moment: your content and your audience. This is your opportunity to show them who you are without the magic of scripts and editing, so take advantage of it, loosen up, and just have fun.
Benefits of Live Streaming on YouTube
Live streaming on YouTube offers numerous benefits for content creators. Here are some key advantages:
1. Real-Time Engagement
- Interactive Communication: Engage directly with your audience through live chat, Q&A sessions, and polls, fostering a sense of community and connection.
- Immediate Feedback: Receive instant reactions and insights from viewers, helping you adapt content on the fly.
2. Monetization Opportunities
- Super Chats and Stickers: Viewers can purchase highlighted messages or stickers during the live stream.
- Ad Revenue: Earn income from ads displayed during your live session.
- Membership Perks: Attract members by offering exclusive live streams.
3. Boosts Engagement Metrics
- Longer Watch Time: Live content often keeps viewers engaged for extended periods, improving your channel’s performance metrics.
- Increased Interaction: High engagement rates can signal to YouTube’s algorithm that your content is valuable, potentially boosting its visibility.
4. Authenticity and Trust Building
- Real-Time Interaction: Live streams showcase spontaneity and transparency, building trust with your audience.
- Human Connection: Allows viewers to see the unedited, human side of your personality.
5. Content Versatility
- Repurpose Content: Save and edit live streams to create highlights, shorter clips, or other content for later use.
- Diverse Formats: Host webinars, tutorials, interviews, concerts, or casual chats.
6. Data and Analytics
- Performance Insights: Access real-time and post-stream analytics to measure audience retention, peak viewership, and interaction rates.
- Audience Understanding: Learn more about viewer demographics and preferences.
By leveraging YouTube’s live streaming capabilities, creators and businesses can effectively engage their audience, promote their brand, and generate new revenue streams.